5.3 Thermal Cycling Test
A moderately stressful thermal cycling test was run over a four day period to further condition the cable before the vibration test and to screen out infant mortality failures and marginal devices. The optical throughput was monitored every 15 minutes during the cycling, for channel 42 in the receptacle to plug direction. This channel was selected because its large number of mating surface features indicated that it was the most likely to degrade during the test. Six times over the duration of the test, the throughput was measured for each of the three remaining channels.
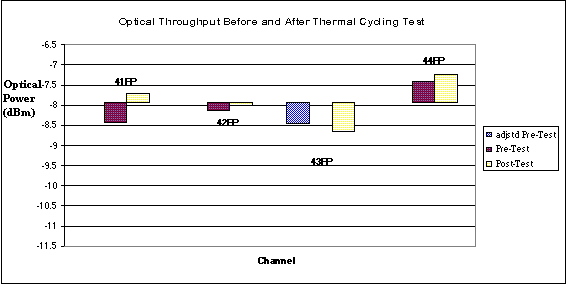
The test data showed that for channel 42, the optical power transmitted did not decrease by more than 0.2 dB during periods of uninterrupted measurement. Channel 41 and 44 did not show any indication of degradation due to the temperature cycling test. The deltas calculated during and after the test indicate that the throughput remained within the established envelope of variation due to repeatability.
Channel 43 was the only channel that consistently showed increased attenuation during this test. Review of the data taken for this channel throughout the evaluation indicates that the pre-thermal cycling test insertion loss value was abnormally low and was probably due to a better than average mating condition for the SMA connectors. A more repeatable value would have been about 0.5 dB higher. Given this adjustment, the variation for channel 43 was within the repeatability envelope established during baselining. Figure 6 shows initial optical throughput and post-thermal cycling throughput for the four channels. The -7.95 dBm value corresponds to the transmitter output and -11.5 dBm corresponds to the upper limit of the cable assembly's performance rating.
5.3.1 Post Thermal Cycling Visual Inspection
Following thermal cycling, the termini were removed from the "453" connector, examined at 255X to 1000X and photographed. The visual inspection showed a significant number of new surface features in the fiber end faces, mainly on the pin side of the connection. In general, the number and size of rough spots seemed to increase. Some new crescent shaped scratches were found on some termini at the outer edge of the cladding. Table 4 gives a listing of these observations.
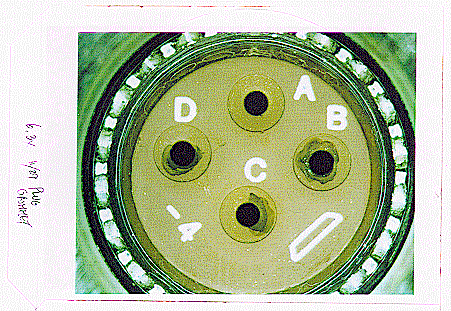
The termini were reinserted into the connector halves after the visual examination and it was noted that a significant amount of debris was created due to the degradation of the grommet material by the insertion/removal tool. Later examination of the connector halves also showed

Table 4. Results of Post Thermal Cycling Visual Examination
Terminus    Description of New Features

41R (pin)   Two new rough spots at center
            Large scratches near radius center and near a rough spot
            that increased in size

41P         Several rough spots, no significant change in features
(socket)    present

42R (pin)   Increased number of rough spots
            Rough spot at crack/scratch site much larger
            Some lines around large crack/scratch may be micro-cracks,
            also one near the center.

42P         Three new large rough spots
(socket)    Pre-existing smaller rough spots grew in size.

43R (pin)   Increased number of rough spots especially at cladding outer
            diameter (OD)
            Scratch emanating from cladding OD

43P         No increase in feature number or size
(socket)

44R (pin)   Increase in number of rough spots
            Two new scratches, one emanating from new edge chip
            Two large straight scratches may be new

44P         Some increase in rough spot size
(socket)    No significant new features
that the insert material was breaking away and metal filings were being left behind after de-coupling the connectors and after removing the backshells (Figure 7).
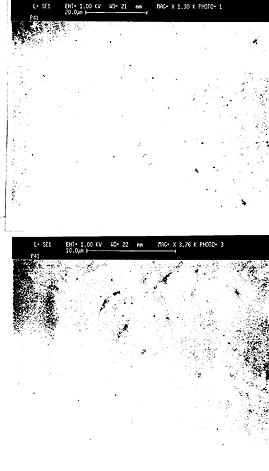
Additional examinations were made of the termini mating faces including the use of the scanning electron microscope (SEM) to try to obtain evidence of origins of the rough spots that were not seen when using the optical microscopes. The SEM photographs in Figure 8 show evidence of a rough fiber surface (at 1300X). The three V shaped features can be seen on the optical microscope photograph as rough spots while equally prominent features that can be seen on the SEM photograph cannot be readily identified on the optical microscope image. This indicates that


Roughness Not Seen in Optical Microscope Photograph
the increase in number of rough spots could be that they are simply growing in size due to environmental conditions, including abrasion between the two glass faces during mating, to a size that is discernable by the microscope.
Another possible source of the increased feature size and new scratches could have been from abrasion by glass particles that were liberated from rough areas at the cladding outer diameter. The shapes and locations of the new scratches support this possibility.
The number and size of the features on the pin termini tended
to increase while those on the socket half did not. This may be
because the pins are more exposed to abrasion during insertion
and removal from the connector than the sockets, the socket face
being protected by the alignment sleeve.
Table of Contents
 Next Section
 Up to TVA Homepage
 Back to the Library